
Mailbox Setup and Webhooks
Prepare mailbox DNS, create an email identity, grant workspace members access, and connect webhooks to receive email events in your application.
Before You Start
- Select the Live workspace that will own the domain and mailbox. Sandbox Virtual Inbox is for simulated messages, not externally received mail.
- The mailbox manager needs
mailbox:writeto create identities and grant access. DNS setup must be completed by someone with the relevant domain permissions and access to your DNS provider. - The receiving user needs
inbox:readplus an explicit mailbox assignment. Addinbox:writefor message-state changes,inbox:deletefor message deletion, andemail:sendif the user should also send from the identity. - Webhook setup is optional for viewing messages in Simply Send. To deliver received-email events to your own application, have an HTTPS endpoint ready and grant the person configuring it
webhook:write.
Setting Up a Mailbox for Yourself
If you are already an active member of the selected workspace, you do not need to invite yourself or add a new member. Continue to steps 1–2 and select yourself when granting mailbox access. You still need the relevant permissions and an explicit mailbox assignment, even if you are an Owner or Admin.
Setting Up a Mailbox for Another User
If the other user is not already an active member of this workspace, someone with team:write must invite them through Account → Workspaces → Members → Add Member. Wait for them to accept before assigning the mailbox in step 2. If they are already an active member, skip the invitation and check their message-reading and sending permissions.
See workspace permissions for the full access reference. A mailbox assignment alone does not grant message-reading or sending permissions.
Which Roles Have Mailbox Permissions?
Owner and Admin include mailbox:read, mailbox:write, and mailbox:delete by default, so they can view, create, assign, and delete mailbox identities. They also include inbox:read, inbox:write, inbox:delete, and email:send.
Other built-in roles do not include these mailbox or inbox permissions, or email:send, by default. Use a custom role or additional grants to give a user only the capabilities they need. For example, inbox:read plus mailbox assignment allows reading without mailbox management.
Assignment is still required: Owners and Admins must also be explicitly assigned to a mailbox to read its messages or send from its identity. Managing mailbox configuration does not automatically grant access to its contents.
Step-by-Step Setup
Complete steps 1–2 to receive and read mail in Simply Send. Step 3 is optional: configure a webhook only if your own application needs to receive email events. Select a step for its instructions, or a link in the Where column to open the user portal. Portal links open in a new tab; sign in and select the correct workspace first.
| Step | Where | What to do |
|---|---|---|
| For another user only | Account → Workspaces → Members | Invite the other user only if they are not already an active member, then wait for acceptance. Skip this invitation for yourself or an existing active member. Check the intended user's reading and sending permissions. |
| 1. Set up DNS | Domains and your DNS provider | Verify the domain, enable Mailbox, and publish and verify its inbound MX record. |
| 2. Create an identity and grant access | Account → Mailboxes | Provision a receiving identity, then use Grant Access to assign it to an active workspace member. Check their reading and sending permissions. Watch the step 2 video and follow the written walkthrough. |
| 3. Create a webhook (optional) | Webhooks → Add Webhook | Only if your own application needs received-email events: subscribe your HTTPS endpoint to Email Received (email_received) and verify incoming signatures. Not required to receive or read mail in Simply Send. |
Step 1: Mailbox DNS Setup
Before creating a receiving mailbox, ask your workspace administrator to open the verified domain under Domains, enable Mailbox, and configure and verify the inbound MX record shown for that domain. Use an inbound subdomain if your root domain already receives email elsewhere. See the Inbound MX Setup Guide before changing existing mail routing.
- Open Domains, select your domain, and complete its normal sending-domain verification.
- Enable Mailbox in the domain configuration. Choose an inbound subdomain prefix if needed and save it.
- Copy the generated inbound MX record to your DNS provider. Use the host, destination, and priority shown for your own domain.
- After DNS propagation, verify the inbound configuration in Simply Send. Continue once mailbox DNS is verified.
Inbound MX Setup Guide
Read our step-by-step instructions on setting up root vs. subdomain prefixes, generating record specifications, and avoiding critical email outages.
Go to Inbound MX Setup Guide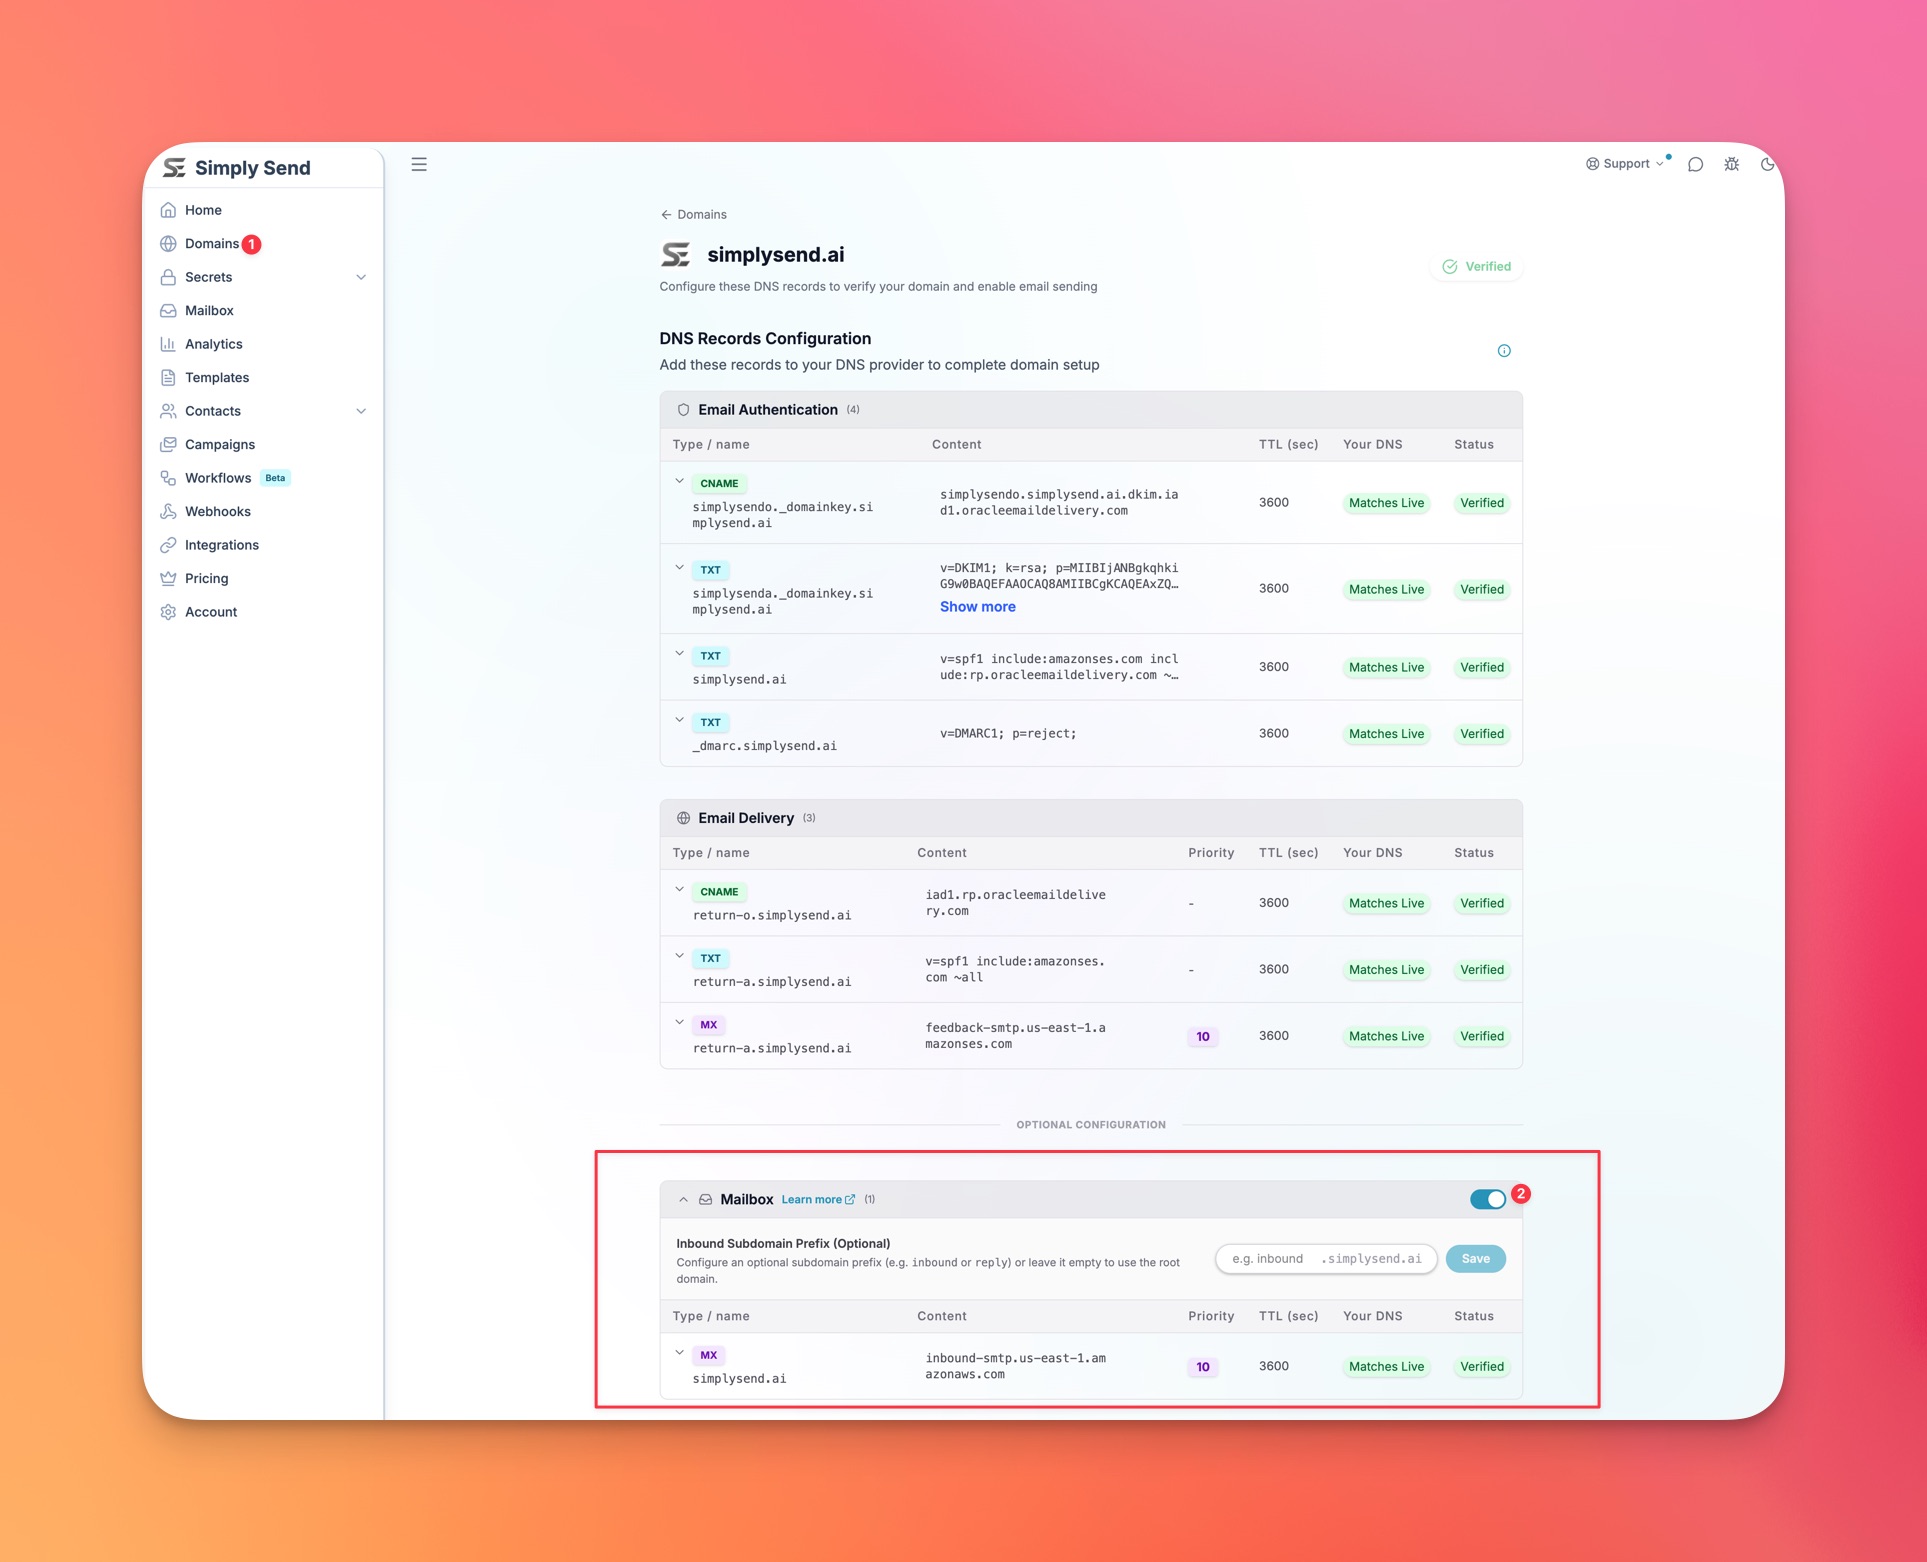
Step 2: Create a Mailbox Identity and Grant User Access
After step 1, follow the video to create a mailbox identity and assign user access. The written walkthrough immediately below the video covers both actions as a single step. Continue to optional step 3 only if your application needs webhook delivery.
Watch: How to Set Up a MailboxWritten Walkthrough: Create and Assign the Identity
- Open Account → Mailboxes in the selected workspace and select Provision identity.
- Choose a receive-capable mailbox rather than a send-only identity. A send-only identity cannot receive incoming messages.
- Choose Private for one assigned user or Shared for multiple users, subject to your workspace limits.
- Select a mailbox-enabled domain, enter the email prefix and required sender name, and confirm the receive and send-as addresses shown in the form.
- Provision the identity. Eligible domains are shown by the mailbox picker; the manager does not need access to the full Domains page.
- Find the identity in Account → Mailboxes and select Grant Access.
- For your own mailbox, select yourself. For another user, select their active workspace membership; invite them and wait for acceptance first only if they are not already a member. Confirm the assignment.
- Check their role or additional grants:
inbox:readis required to read received messages;email:sendis required to send. - Ask the user to select this workspace, open Mailbox in the left navigation, and choose the assigned mailbox. Send a test email to its receive address to check that a message arrives.
Owner or Admin status does not automatically grant access to mailbox contents. Assign the identity explicitly, including when you want to use it yourself.
Step 3 (Optional): Create a Webhook for Your Application
After creating the mailbox and assigning access, optionally configure a webhook to deliver received-email events to your application. Webhooks are not required to read messages in the Simply Send Mailbox page.
Webhook Registration Steps
- Go to Webhooks in the selected workspace and select Add Webhook.
- Provide your secure HTTPS destination URL (e.g.
https://api.yourdomain.com/webhooks/simply-send). - Select Email Received (
email_received) as the event. - Create the webhook and securely store its signing secret. Never expose the secret in browser code.
- Verify webhook signatures on your server using the raw request body. Send a test email to the mailbox and check both the mailbox and your webhook endpoint.
Webhook Event Payload Structure
When an email is received, Simply Send sends an HTTP POST request containing a structured JSON payload containing the sender, recipients, subject line, body summary text, and attachment metadata.
Webhook Security & Signature Verification
Simply Send adds cryptographic signatures to prevent tampering and spoofing. Every webhook post includes a signature in the X-Webhook-Signature header.
To verify the signature, compute an HMAC-SHA256 hash using your webhook's **Signing Secret** and the raw JSON request body, then compare it to the received header value.
Credit Consumption & Cost
Inbound email processing consumes credits from your Simply Send account balance at the same rate as outbound sending. Credits are charged per recipient processed, depending on the usecase of your verified domain:
Transactional Domains
Domains configured for Transactional use cases (e.g. transactional emails, notifications, alerts).
Marketing Domains
Domains configured for Marketing use cases (e.g. inbound newsletters, bulk campaign replies).
Free and Prepaid Plans: Incoming emails will only be accepted and parsed if your credit balance is greater than 0. If your balance is depleted, incoming emails will not be processed, meaning they will not be delivered to your Simply Send Inbox UI or forwarded to your webhook endpoints.
Retention and Attachment Storage
Parsed inbound email metadata resides securely in your Simply Send account and is automatically purged according to your plan limits:
- Free Tier Accounts: 7 days retention limit.
- Paid Pro Accounts: 30 days retention limit.
- Enterprise Accounts: Custom retention limit.
To fetch complete parsed email MIME files or raw message attachments, use the Inbound Emails endpoints in the Simply Send API or download them directly from the Inbox panel inside your console dashboard.
Next Step: API Reference for Webhooks
Review the Webhooks API endpoints to create, list, modify, or delete webhook endpoints programmatically.
API Reference: Webhooks